
DIY Murphy bed
Are you tired of cramped living spaces and cluttered rooms? Do you dream of maximizing your square footage without sacrificing style or comfort? Look no further than the ingenious DIY Murphy bed! 🛏️
In today’s world of compact living, space-saving solutions are more valuable than ever. A Murphy bed, which folds up against the wall when not in use, offers the perfect blend of functionality and style. While store-bought models can cost thousands of dollars, crafting your own DIY Murphy bed can save you a significant amount of money while allowing for customization to fit your unique needs and décor. From modern designs with built-in shelves to multifunctional options featuring attached desks, the possibilities are endless.
In this comprehensive guide, readers will discover the benefits of DIY Murphy beds, explore various design options, and learn about the essential materials and tools needed for construction. Step-by-step instructions will walk them through the building process, while safety considerations and expert tips ensure a successful project. Whether they’re looking to transform a guest room, optimize a studio apartment, or create a versatile home office space, this blog post will provide all the information needed to embark on an exciting DIY Murphy bed journey. 🔨🎨
Types of DIY Murphy Bed Designs
Now that we’ve explored DIY Murphy beds, let’s delve into the various types of designs available for those looking to embark on their own project. DIY enthusiasts have a range of options to choose from, each catering to different space requirements and personal preferences.
Vertical vs. Horizontal Orientations
When considering a DIY Murphy bed, one of the first decisions to make is whether to opt for a vertical or horizontal orientation.
| Orientation | Advantages | Best Suited For |
|---|---|---|
| Vertical | Space-efficient, traditional look | Rooms with higher ceilings |
| Horizontal | Easier to access, unique appearance | Rooms with lower ceilings or wider wall space |
Vertical Murphy beds are the more common choice, offering a classic look that maximizes floor space when folded up. Horizontal designs, on the other hand, provide a fresh aesthetic and can be more convenient for those who may have difficulty lifting a vertically-oriented bed.
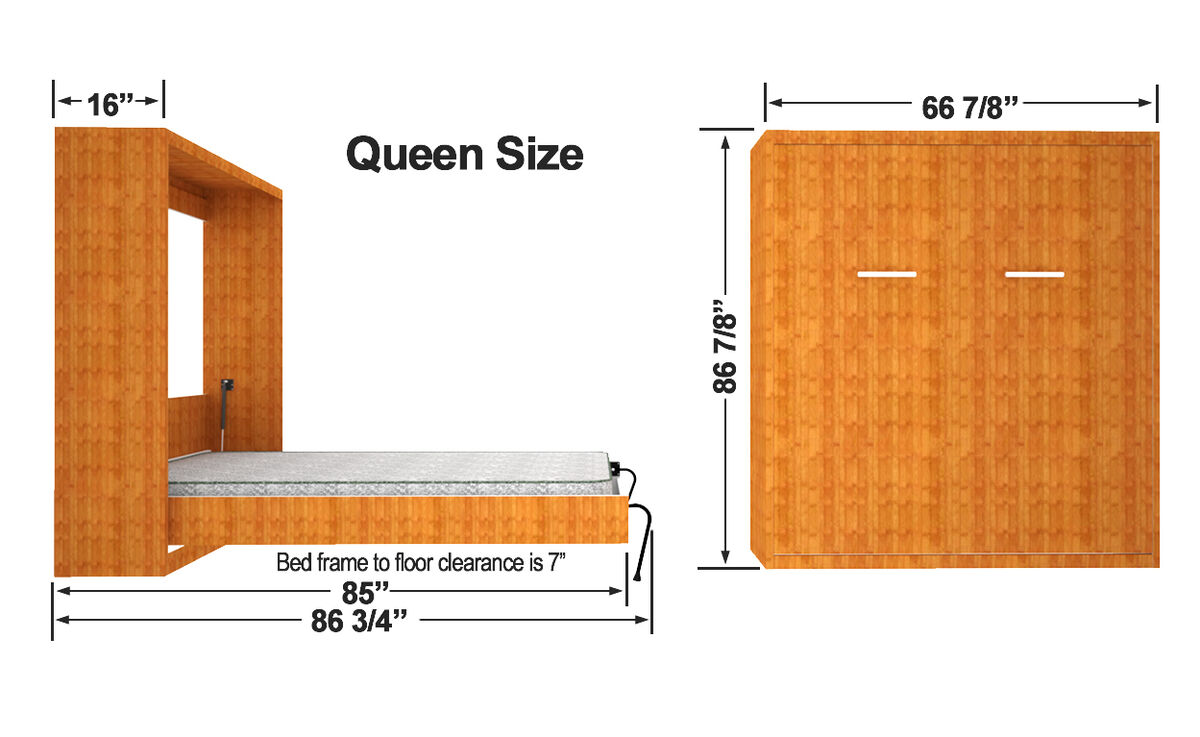
Single, Twin, and Queen-Sized Options
DIY Murphy beds come in various sizes to accommodate different needs:
- Single: Ideal for children’s rooms or small guest spaces
- Twin: Perfect for teenagers or compact guest rooms
- Queen: Suitable for couples or those desiring more sleeping space
Each size presents its own set of challenges and benefits in terms of construction and space utilization. Queen-sized Murphy beds, for instance, offer ample sleeping space but require more robust mechanisms and larger wall areas for installation.
Multifunctional Designs
Many DIY Murphy bed projects incorporate additional features to enhance functionality:
- Murphy bed with desk: Combines sleeping and working areas, ideal for home offices or playrooms
- Built-in shelving: Provides extra storage and decorative space
- Integrated cabinets: Offers closet-like storage on either side of the bed
These multifunctional designs maximize the utility of the Murphy bed, making it a versatile piece of furniture that serves multiple purposes in a single room. Some creative options even include pet beds or charging ports, catering to specific lifestyle needs.
Essential materials for DIY Murphy Bed
Now that we have explored various DIY Murphy bed designs, it’s crucial to understand the essential materials and tools required for construction. This knowledge will help DIY enthusiasts prepare effectively for their projects.
Wood Types and Dimensions
When constructing a DIY Murphy bed, the choice of wood is paramount. Most projects utilize a combination of plywood and solid wood. Here’s a breakdown of commonly used materials:
| Wood Type | Recommended Use |
|---|---|
| Plywood | Mattress base, wall cabinet |
| Solid Wood | Bed frame, trim |
Typical dimensions for a queen-size Murphy bed project include:
- 3/4″ plywood for the mattress base and cabinet
- 1×4 boards for bed rails and supports
- 1×2 boards for additional framing
Hardware Kits and Mechanisms
A critical component of any DIY Murphy bed is the hardware kit. These kits typically include:
- Steel Balance Lift Mechanism
- Springs
- Legs
- Pivot mechanism
Many DIY enthusiasts opt for pre-assembled hardware kits, such as those from CreateABed or Murphy Bed Depot. These kits often come with:
- Detailed instructions
- Cut lists
- Lifetime warranties
It’s important to note that hardware kits usually do not include wood or cabinetry, allowing for customization in design.
Necessary Tools for Construction
To successfully build a DIY Murphy bed, the following tools are essential:
- Circular saw or table saw
- Drill and drill bits
- Screwdriver set
- Measuring tape
- Level
- Sander
- Wood glue
- Clamps
Additional tools that can be helpful include:
- Pocket hole jig
- Router (for decorative edges)
- Paint sprayer (if painting the finished product)
With these materials and tools at hand, DIY enthusiasts are well-equipped to move on to the step-by-step construction process. The next section will delve into the detailed instructions for assembling the mattress base, wall cabinet, and integrating the folding mechanism to create a functional and space-saving Murphy bed.
DIY Murphy Bed Construction
5 Essential Steps to Build Your Murphy Bed
Step 1: Design and Preparation
- Carefully measure the space where the Murphy bed will be installed
- Create a detailed blueprint of the bed, accounting for mattress size and wall clearance
- Calculate precise dimensions for the bed frame, cabinet, and mounting hardware
- Select high-quality plywood or hardwood for durability
- Prepare a cut list for all wood components
Step 2: Build the Wall Cabinet Frame
- Cut the side panels, top, and bottom panels to your predetermined specifications
- Use a circular saw or table saw for precise cuts
- Sand all wood pieces to ensure smooth surfaces
- Apply wood glue to reinforce joint connections
- Use clamps to hold pieces together while the glue dries
- Drill pilot holes and use wood screws to secure the cabinet frame
- Ensure the frame is perfectly square using a level
Step 3: Construct the Bed Frame
- Cut the bed frame pieces to match your mattress dimensions
- Create a sturdy frame using robust wood supports
- Build a plywood base to support the mattress
- Install support slats across the frame for additional stability
- Add reinforcement blocks at stress points
- Sand all surfaces and edges for a smooth finish
- Test the frame’s strength and rigidity before final assembly
Step 4: Install the Folding Mechanism
- Purchase high-quality murphy bed lift mechanisms or counterbalance springs
- Carefully follow manufacturer’s instructions for installation
- Mount the lifting mechanisms symmetrically on both sides of the bed frame
- Test the mechanism multiple times to ensure smooth operation
- Adjust tension springs for balanced, easy lifting and lowering
- Verify that the bed locks securely in both up and down positions
Step 5: Final Assembly and Mounting
- Attach the bed frame to the wall cabinet frame
- Use heavy-duty wall anchors appropriate for your wall type
- Ensure multiple secure mounting points for maximum stability
- Install any trim or decorative elements
- Add safety locks or latches to prevent accidental opening
- Apply finish or paint as desired
- Mount the completed Murphy bed unit securely to wall studs
Safety Recommendations
- Always use a stud finder and mount directly into wall studs
- Double-check all measurements before cutting
- Wear safety glasses and follow proper workshop safety protocols
- Have a second person assist with heavy lifting and mounting
- Periodically check and maintain the bed’s mounting and mechanism
Estimated Project Details
- Difficulty Level: Intermediate to Advanced
- Estimated Time: 2-3 full days
- Estimated Cost: $500-$1,500 (depending on materials and hardware)
